After writing about cgroups, it’s hard not to get sucked into the rest of the low-level Linux technologies that make up containers. In addition to cgroups, the main other technology is namespaces, which give processes different views of critical system resources.
For example, the mnt namespace allows us to isolate what mount points a
process sees (eg, give the process a new root file system — including special
mounts like proc), while the cgroups namespace allows us to isolate a
process completely to a new cgroup hierarchy. Other namespaces form further
pieces of isolating containers from each other and the host system. I hope to
write more about namespaces, and build a bare-bones container runtime.
(When writing the cgroups article I wondered how to prevent a process “escaping” its cgroup. I think this is our answer: give it its own cgroup namespace, and it cannot move itself outside its original cgroup).
For this post, we’ll look at the net namespace. There’s quite a lot to talk
about here, because in addition to the isolation provided by the namespace,
there are a number of low-level networking constructs we have to scaffold up to
allow a process in a namespace to talk to other network namespaces, the host
machine and, finally, the public internet.
What do I hope to gain? By piecing this together, admittedly by mostly adapting others’ work to my specific goals, I hope to get a more solid understanding of how container networking works, to help ground my mostly theoretical knowledge of Kubernetes overlay networks.
Let’s go.
Running networking commands
Almost all the examples use the ip tool. This allows us to both run network
management commands and to execute programs in different network namespaces.
Here’s a quick rundown:
# Run a command on the host network stack
# Output the host routing table:
[root@lima]# ip route

# Run a command in a separate namespace
[root@lima]# ip netns exec <other_namespace> <command_to_run>

# Eg: run ping using the other_namespace network stack
[root@lima]# ip netns exec other_namespace ping 8.8.8.8

# Eg: examine a routing table using ip route in another namespace
[root@lima]# ip netns exec other_namespace ip route
The key thing to note is that ip netns exec other_namespace ip route is not a
special ip command invocation, but instead using
ip netns exec other_namespace to execute ip route in other_namespace, just
like the ping example.
ip is one of those tools that operates on nouns, like kubectl does. But
while kubectl uses a verb noun approach (eg, kubectl get pods), ip uses
a noun verb approach (eg, ip link add).
Here are the nouns we will use:
ip link— manipulate network devices (at L2, ethernet level).ip addr— work with L3 (IP) addresses.ip route— view and change L3 (IP) routes.ip addralso implicitly adds routes.ip netns— manage network namespaces.
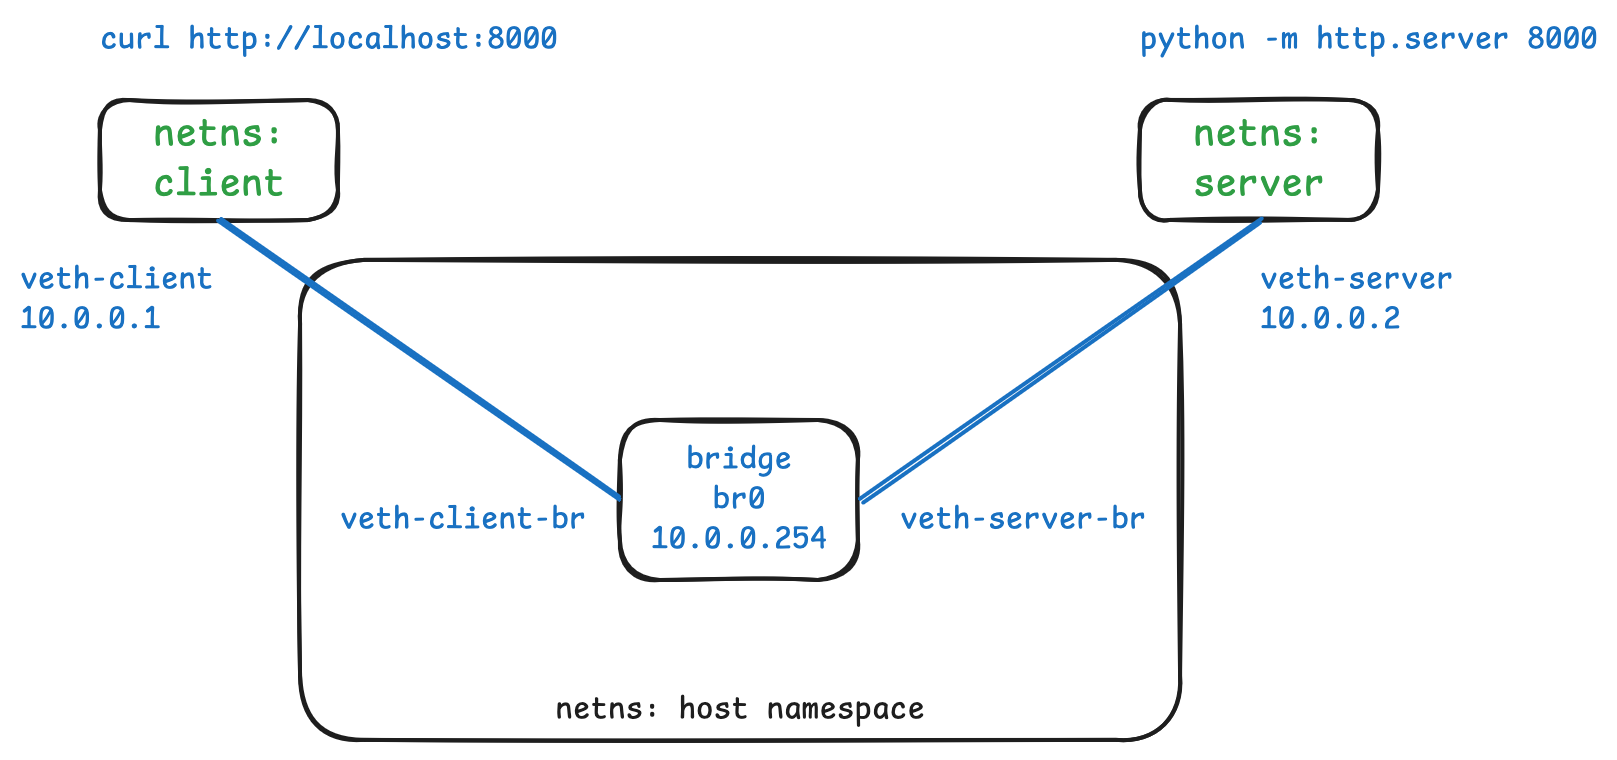
Setting up container connectivity step by step
To ground us, let us first try to build a specific thing. Our aim is to run a
web server on port 8000 in a server network namespace (running
python -m http.server 8000) and be able to make requests from that server from
a client network namespace (using curl http://localhost:8000). While this
might be a bit simpler than connecting up two containers launched with something
like Docker or Podman, I think it covers the main ground.
In this section, I found it helpful to build up a diagram as we go to see how the networking bits fit together.
I built this on macOS in a Lima VM running Fedora.
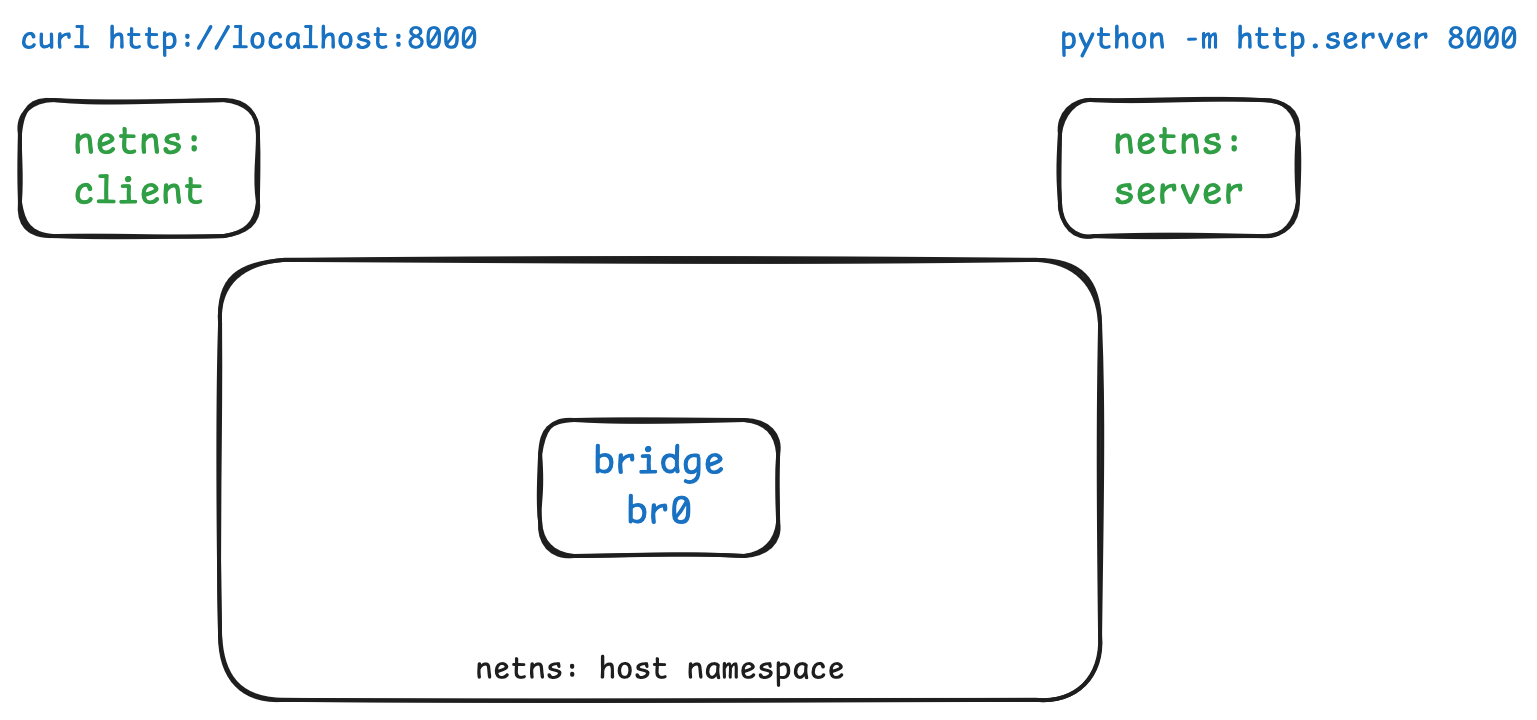
1. Create the namespaces and bridge
First we add the two separate network namespaces. We’ll use a bridge to connect them together. We bring the bridge up so that it’s ready for use.
[root@lima]# ip netns add client
[root@lima]# ip netns add server
[root@lima]# ip link add br0 type bridge
[root@lima]# ip link set dev br0 up
Here’s what the setup now looks like, including the commands we hope to run successfully later:
What’s a bridge?
A linux virtual bridge (usually called a switch in physical networks) is a network element that will forward packets between Ethernet network devices or segments. In our network, the two namespaces are “devices”, as is the host machine.
We could connect the containers together with a single veth pair, but the
bridge will be need later to allow applications running in the network
namespaces to access the external internet.
We could also create more network namespaces and attach them to the bridge to host potentially dozens of isolated services on a single machine.
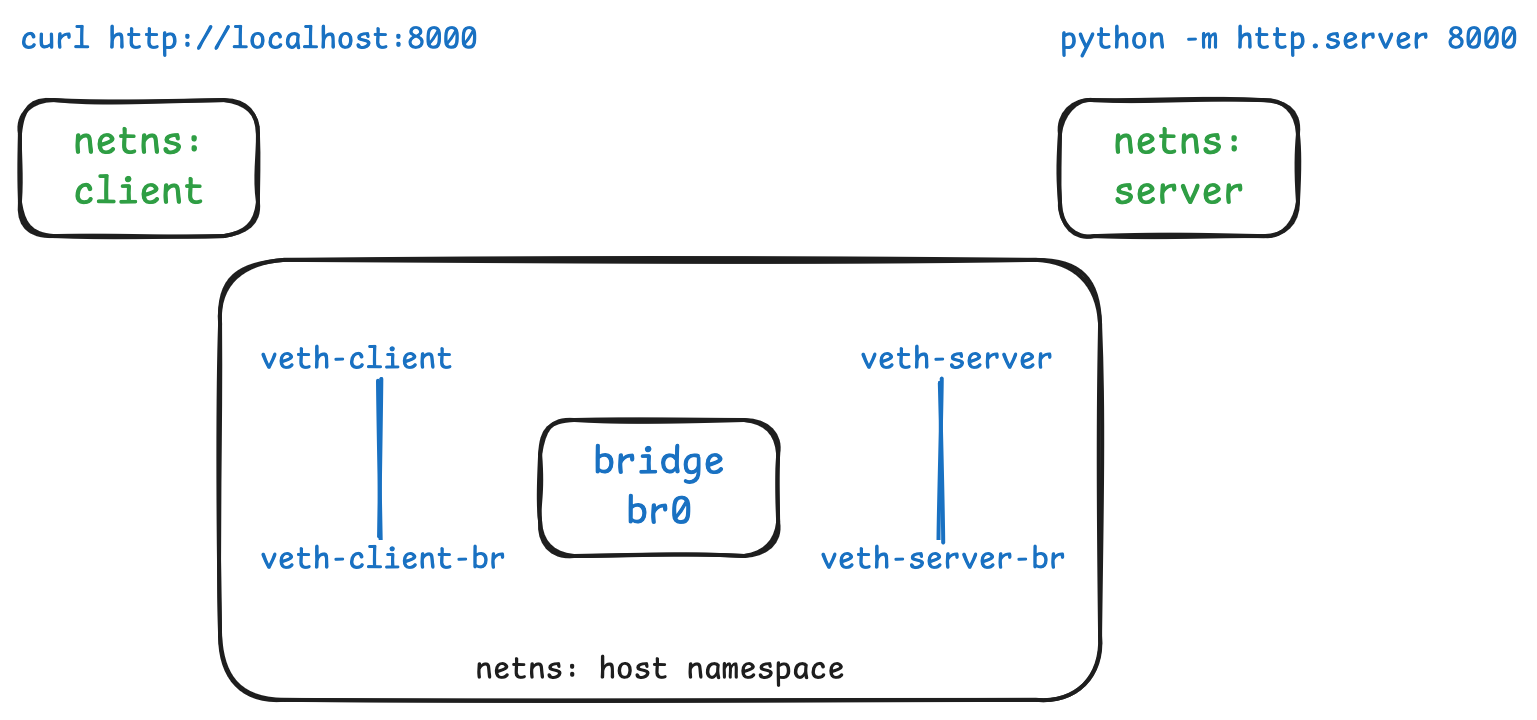
2. Create the virtual ethernet “cables” to connect everything
To connect the bridge to the network namespaces, we use veth link pairs. The
pairs work at network L2: they have MAC addresses and operate at the level of
ethernet frames. A pair is connected together like a pipe. Ethernet frames put
in one end will come out of the other end.
We will name our pairs as follows: veth-X will be moved to the relevant
namespace X, and veth-X-br will be connected to the bridge.
[root@lima]# ip link add veth-client type veth peer name veth-client-br
[root@lima]# ip link add veth-server type veth peer name veth-server-br
Read this as “add veth-client which is a veth and automatically create a
peer paired veth called veth-server-br”.
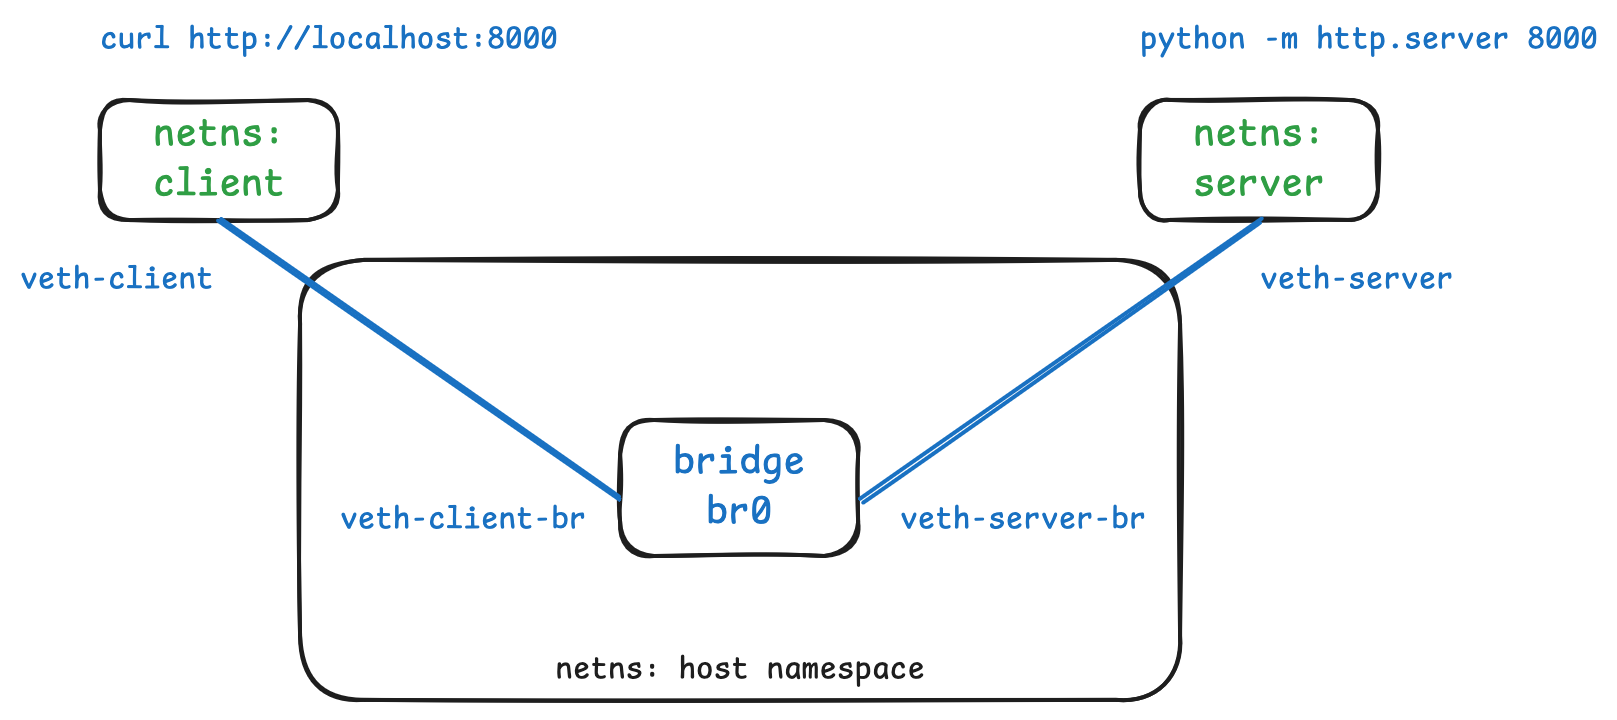
3. “Connect” the cables up
At this point the two veth pairs are a bit like cables waiting to be plugged
in. We can further imagine that both the bridge and the two namespaces have
ports waiting for the ends of the cable.
(This isn’t completely true — veth links are L2 constructs rather than L1,
where L1 is the physical network that contains real world stuff like “cables”.
But it helps understand their function in the virtual network topology).
Let’s plug them in:
# Connect the client namespace and the bridge
[root@lima]# ip link set veth-client netns client
[root@lima]# ip link set veth-client-br master br0

# Connect the server namespace and the bridge
[root@lima]# ip link set veth-server netns server
[root@lima]# ip link set veth-server-br master br0
Why master in ip link set veth-server-br master br0?
According to this stackoverflow answer:
When you add a network device, such as a virtual Ethernet (veth) pair, to a network bridge using the master option, you are effectively making that network bridge the “master” of the device. The bridge assumes control over the device’s connectivity, forwarding packets between the devices attached to the bridge.
Seems reasonable to me.
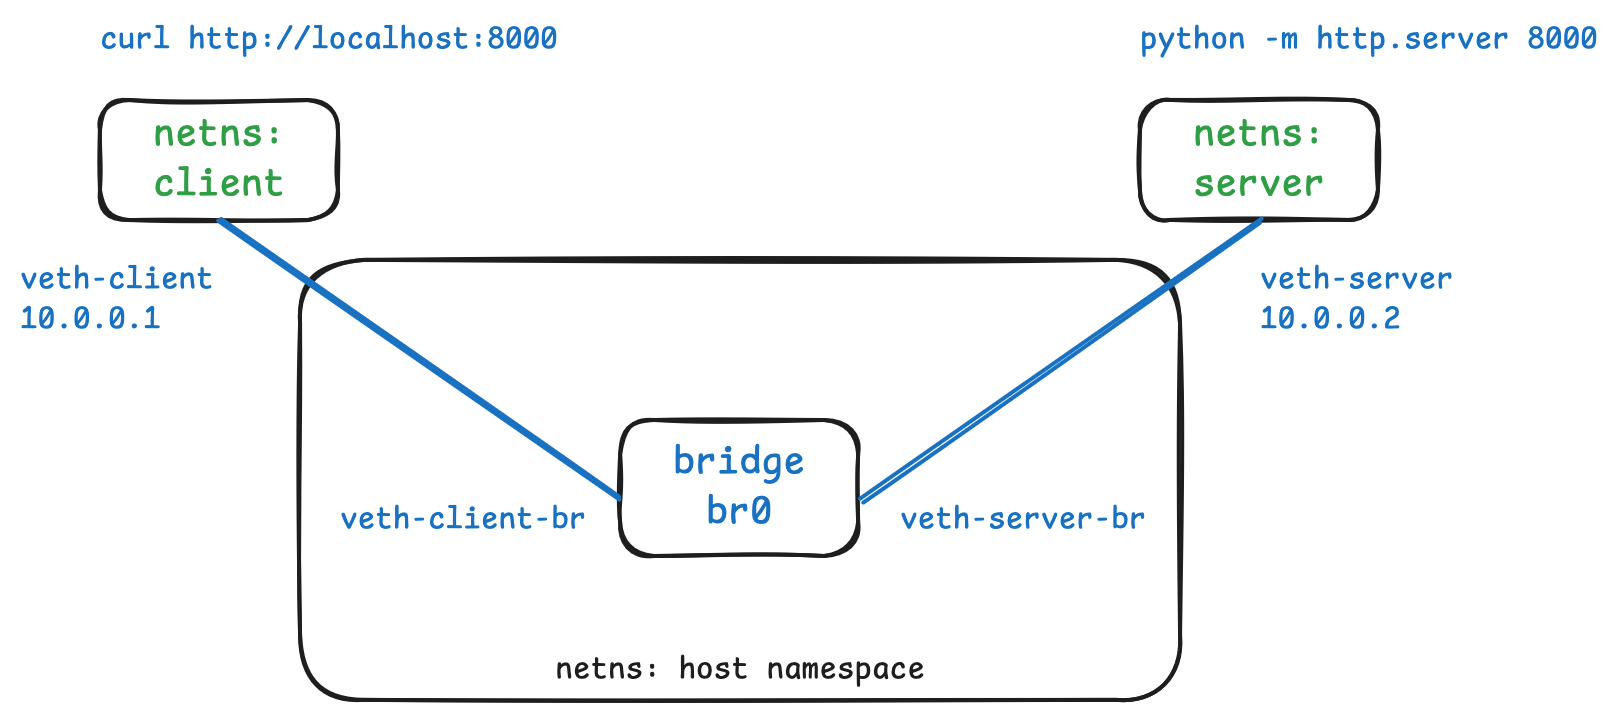
4. Make the network namespaces routeable to each other
Now the veth “cables” are connected, the ends in the client and server
network namespaces need to be given IP addresses.
# Set the IP address for the veth in the client and server namespaces
[root@lima]# ip netns exec client ip addr add 10.0.0.1/24 dev veth-client
[root@lima]# ip netns exec server ip addr add 10.0.0.2/24 dev veth-server
Only the network namespaces need IPs, as the servers running in the namespaces need to be addressable by clients. Conversely, the ends attached to the bridge don’t need IP addresses because they are just plugged into some virtual infrastructure.
We can double check the assigned IPs are what we expect using ip addr show in
the appropriate network namespaces:
# ip netns exec client ip addr show veth-client
6: veth-client@if5:
...
    inet 10.0.0.1/24 scope global veth-client
...

# ip netns exec server ip addr show veth-server
8: veth-server@if7:
...
    inet 10.0.0.2/24 scope global veth-server
...
Once the IP addresses have been assigned, we need to bring both ends of each
link up to make them usable.
# Bring the connection in each namespace up
[root@lima]# ip netns exec client ip link set veth-client up
[root@lima]# ip netns exec server ip link set veth-server up

# Bring the bridge side of the veth pairs up
[root@lima]# ip link set veth-client-br up
[root@lima]# ip link set veth-server-br up
5. Check connectivity
Now we can execute server:
[root@lima]# ip netns exec server python -m http.server 8000
Serving HTTP on :: port 8000 (http://[::]:8000/) ...
::ffff:10.0.0.1 - - [15/Nov/2025 15:59:48] "GET / HTTP/1.1" 200 -
And the client can reach it:
[root@lima]# ip netns exec client curl http://10.0.0.2:8000
<!DOCTYPE HTML>
<html lang="en">
<head>
... lots more content ...
At this point the two network namespaces can access each other over the bridge,
and we’ve set them up in the same network subnet (10.0.0.0/24).
Accessing server namespace from host
Right now client and server can talk to each other, but are otherwise
isolated from the world. As an example, we can’t curl the server namespace
from the host:
[root@lima]# curl http://10.0.0.2:8000
curl: (7) Failed to connect to 10.0.0.2 port 8000 after 4024 ms: Could not connect to server
Let’s fix that.
1. Make the namespaces routable from the host
The server and client are in the 10.0.0.0/24 subnet — IPs from 10.0.0.1 to
10.0.0.255. Right now, when we try to reach 10.0.0.2 from the host, the
kernel matches the default route and sends packets out via eth0 to the Lima
hypervisor:
[root@lima]# ip route
default via 192.168.5.2 dev eth0 proto dhcp src 192.168.5.15 metric 100
192.168.5.0/24 dev eth0 proto kernel scope link src 192.168.5.15 metric 100
The hypervisor doesn’t know anything about our 10.0.0.0/24 network, so those
packets go nowhere. We need to add a more specific route that tells the kernel
to send packets for that subnet to our bridge instead.
We can fix that by giving the bridge an IP in the subnet on the host (note the
same /24):
[root@lima]# ip addr add 10.0.0.254/24 dev br0
When we add the 10.0.0.254/24 address to the bridge, we are not just adding
the IP to the bridge but also saying that all IPs in the 10.0.0.0/24 subnet
are routable via the bridge. The kernel adds this as a route to the routing
table:
[root@lima]# ip route
... other routes ...
10.0.0.0/24 dev br0 proto kernel scope link src 10.0.0.254
... other routes ...
And when we ask how we’d route to 10.0.0.2 we can see that packets would be
routed via the bridge, br0:
[root@lima]# ip route get 10.0.0.2
10.0.0.2 dev br0 src 10.0.0.254 uid 0
    cache
The bridge now has an IP and can be used for routing into the two network namespaces from the host:
A minute on IP routing
One thing that I sometimes forget is that, at each machine, we are only concerned with the next hop to get to the IP address. The destination address might or might not exist; the machine is only concerned with sending the packet towards its destination. Instead, I slip into thinking that machines know the whole route in advance; it’s easier to think that way. But that’s not true.
This can be seen if we ask for the route to an IP that doesn’t exist, but is within the subnet:
[root@lima]# ip route get 10.0.0.123
10.0.0.123 dev br0 src 10.0.0.254 uid 0
    cache
We can see that, from the kernel’s point of view, it knows where to send it, even if, ultimately, there is no one waiting to pick up at the other end.
2. Check connectivity from host to namespace
But 10.0.0.2 does exist, and we have a server on port 8000, and now the
packets can be routed from the host to that server:
[root@lima]# curl http://10.0.0.2:8000
<!DOCTYPE HTML>
<html lang="en">
<head>
...
Accessing the public network from inside the namespaces
The server and client network namespaces can access servers within the two
namespaces, as the bridge forwards the packets between them. In addition, the
host can reach servers on within the namespaces. Processes running in the
namespaces can’t access anything else, however, as they don’t know how to route
packets to IPs outside their 10.0.0.0/24 subnet.
We can see this in the client namespace’s routing table:
[root@lima]# ip netns exec client ip route
10.0.0.0/24 dev veth-client proto kernel scope link src 10.0.0.1
We can see that any packets for IPs in the 10.0.0.0/24 subnet will be routed
via the veth-client which is attached to the bridge. For any other IPs, the
kernel just doesn’t know what to do:
[root@lima]# ip netns exec client ip route get 8.8.8.8
RTNETLINK answers: Network is unreachable
1. Add a default route via the bridge to the namespace
Let’s tell the kernel that it can use the bridge (at 10.0.0.254) as its route
to anywhere (the default route):
[root@lima]# ip netns exec client ip route add default via 10.0.0.254
Now the kernel has a routing table that says “if there isn’t a more specific
entry, default to sending packets on veth-client via the bridge” (recall we
gave the bridge the IP 10.0.0.254. We can see this by checking the route to
8.8.8.8 again:
[root@lima]# ip netns exec client ip route get 8.8.8.8
8.8.8.8 via 10.0.0.254 dev veth-client src 10.0.0.1 uid 0
    cache
This means that the kernel will now try to route the packets via the bridge, rather than saying the network isn’t reachable. This still doesn’t fully work, however:
[root@lima]# ip netns exec client ping 8.8.8.8
PING 8.8.8.8 (8.8.8.8) 56(84) bytes of data.
^C
--- 8.8.8.8 ping statistics ---
4 packets transmitted, 0 received, 100% packet loss, time 3056ms
If we tcpdump on that interface we can even see ping’s ICMP echo requests,
but without responses:
[root@lima]# tcpdump -i br0 -n icmp
dropped privs to tcpdump
tcpdump: verbose output suppressed, use -v[v]... for full protocol decode
listening on br0, link-type EN10MB (Ethernet), snapshot length 262144 bytes
18:56:04.107492 IP 10.0.0.1 > 8.8.8.8: ICMP echo request, id 5093, seq 1, length 64
18:56:05.154033 IP 10.0.0.1 > 8.8.8.8: ICMP echo request, id 5093, seq 2, length 64
Now the packets can escape the namespace over the bridge, but then the host machine drops the packets.
2. Set up the packet forwarding on the host
Packets now reach the host but are being dropped on the floor by the kernel.
This is because the default configuration for the kernel is not to forward
packets from other networks. Once we enable forwarding, we also have to enable
NAT so the kernel
will translate the world inside the machine (with client and server in it)
into the world outside the machine (which only has the machine visible to it).
First we enable packet forwarding in the kernel:
[root@lima]# sysctl -w net.ipv4.ip_forward=1
3. Allow only bridge to ethernet (and back) forwarding
Next we have to set up iptables to shuttle packets between
veth-client/veth-server and the host machines ethernet port, eth0, that’s
connected to the internet. As the namespaces are both connected to the bridge,
we actually just need to connect up the bridge, br0 to eth0.
First, we want to set things up so that we only allow forwarding between the
bridge and the ethernet port, just to be on the safe side. So first we set the
default policy on the FORWARD chain to DROP, meaning all attempts to forward
will fail:
[root@lima]# iptables -P FORWARD DROP
[root@lima]# iptables -L FORWARD
Chain FORWARD (policy DROP)
target     prot opt source               destination
What’s iptables?
iptables is Linux’s firewall and packet manipulation tool. It organizes rules
into chains that packets pass through at different points in their journey
through the kernel.
For our purposes, two chains matter:
FORWARD: packets passing through this machine (not destined for it)POSTROUTING: packets about to leave the machine
Rules are also grouped into tables for different purposes. The default
filter table decides whether to allow or drop packets. The nat table
rewrites addresses — which we’ll need so our namespaces can talk to the outside
world.
When a packet from the client namespace wants to reach 8.8.8.8, it first
hits the FORWARD chain (where we decide if it can pass through), then the
POSTROUTING chain in the nat table (where we rewrite its source address).
Next we allow forwarding between eth0 and br0 in both directions (ie, two
rules, swapping the input interface -i with the output interface -o in the
second rule).
[root@lima]# iptables -A FORWARD -i eth0 -o br0 -j ACCEPT
[root@lima]# iptables -A FORWARD -i br0 -o eth0 -j ACCEPT
As we set this up using interfaces, and -L doesn’t show interfaces by default,
let’s use -S for a “plain” view showing the current state:
[root@lima]# iptables -S
-P INPUT ACCEPT
-P FORWARD DROP                       # our default drop
-P OUTPUT ACCEPT
-A FORWARD -i eth0 -o br0 -j ACCEPT   # our two way carve-out for
-A FORWARD -i br0 -o eth0 -j ACCEPT   # the specific interfaces
4. Set up NAT
The iptables commands we used so far alter the main filter table. NAT is set
up using the nat table. The nat table starts out empty and so does nothing:
[root@lima]# iptables --table nat -L
Chain PREROUTING (policy ACCEPT)
target     prot opt source               destination

Chain INPUT (policy ACCEPT)
target     prot opt source               destination

Chain OUTPUT (policy ACCEPT)
target     prot opt source               destination

Chain POSTROUTING (policy ACCEPT)
target     prot opt source               destination
To enable masquerading from our 10.0.0.0/24 subnet onto the main (virtual)
ethernet card on the host (eth0):
iptables -t nat -A POSTROUTING -s 10.0.0.0/24 -o eth0 -j MASQUERADE
As noted earlier, the client and server are both attached to the bridge, meaning
that this will set things up to work for both the client and server
namespaces — presuming those namespaces have a default route via the bridge.
We did this for the client namespace in step 1 in this section.
As we set that route up for the client namespace already, we can now
successfully ping the outside from the client namespace:
[root@lima]# ip netns exec client ping 8.8.8.8
PING 8.8.8.8 (8.8.8.8) 56(84) bytes of data.
64 bytes from 8.8.8.8: icmp_seq=1 ttl=63 time=0.387 ms
64 bytes from 8.8.8.8: icmp_seq=2 ttl=63 time=0.597 ms
64 bytes from 8.8.8.8: icmp_seq=3 ttl=63 time=0.750 ms
64 bytes from 8.8.8.8: icmp_seq=4 ttl=63 time=0.665 ms
^C
--- 8.8.8.8 ping statistics ---
4 packets transmitted, 4 received, 0% packet loss, time 3074ms
rtt min/avg/max/mdev = 0.387/0.599/0.750/0.134 ms
With all this set up, we only need to add a default route in the server
namespace via br0 (at 10.0.0.254), to allow external connectivity from the
server namespace too:
[root@lima]# ip netns exec server ip route add default via 10.0.0.254

[root@lima]# ip netns exec server ping -c2 8.8.8.8
PING 8.8.8.8 (8.8.8.8) 56(84) bytes of data.
64 bytes from 8.8.8.8: icmp_seq=1 ttl=63 time=0.761 ms
64 bytes from 8.8.8.8: icmp_seq=2 ttl=63 time=0.646 ms
--- 8.8.8.8 ping statistics ---
2 packets transmitted, 2 received, 0% packet loss, time 1004ms
rtt min/avg/max/mdev = 0.646/0.703/0.761/0.057 ms
What’s MASQUERADE?
I was curious how the masquerade NAT works, so I asked Claude:
MASQUERADEis a special target in iptables’ NAT table that performs dynamic source network address translation. When a packet matches a rule with theMASQUERADEtarget, the kernel rewrites its source IP address to match the current IP address of the outgoing network interface. This happens in thePOSTROUTINGchain, just before the packet leaves the system.Under the hood, the kernel’s connection tracking system (
conntrack) maintains a mapping between the original source address and port tuple and the translated address and port. When reply packets arrive,conntrackuses this mapping to reverse the translation, ensuring the response gets delivered back to the original sender. This bidirectional translation happens transparently, allowing hosts with private IP addresses to communicate with the outside world through a gateway with a public IP.
It’s “dynamic” address translation because it takes whatever IP is assigned to the outgoing network interface. So it works in environments where a host might change IP — eg, via DHCP. In “static” NAT (SNAT) you hardcode the IP address into the rule.
As usual, I asked Claude “Search for references that confirm the information in
this paragraph” and it came up with section
7.4. FORWARD and NAT Rules
in the RedHat documentation.
Network address translation part 2
in the Fedora magazine has more details on conntrack’s role.
Further reading
- Proper isolation of a Linux bridge. We’ve discussed configuring network namespaces, as used in containers. This article talks more about configuring for VMs, focusing on isolating the VMs from the hypervisor management/infrastructure network.
I used these posts and articles while writing this one. While they cover very similar ground to this post, I find it useful to work through my own scenarios and write them up to solidify my own understanding.